04 장
UITableView, section, row, header, footer


Simple TableView


Delegate Protocol

// Simple TableView
import UIKit

class ViewController: UIViewController, UITableViewDataSource, UITableViewDelegate {

    @IBOutlet var tableView: UITableView!

    let data = ["Dog", "Cat", "Cow", "Pig", "Dophine"]
    let subData = ["강아지", "고양이", "황소", "돼지", "돌고래"]

    override func viewDidLoad() {
        super.viewDidLoad()
        // Do any additional setup after loading the view, typically from a nib.

        // delegate 연결
        tableView.delegate = self
        tableView.dataSource = self
    }

    // Delegate 객체에게 Section의 갯수 생성 요청
    func numberOfSectionsInTableView(tableView: UITableView) -> Int {
        return 1
    }

    // Delegate 객체에게 Section 내의 row의 갯수 생성 요청
    func tableView(tableView: UITableView, numberOfRowsInSection section: Int) -> Int {
        return data.count
    }

    // cell의 생성 및 데이터 출력
    func tableView(tableView: UITableView, cellForRowAtIndexPath indexPath: NSIndexPath) -> UITableViewCell {

        let cell = tableView.dequeueReusableCellWithIdentifier("cell") as UITableViewCell!
        let row = indexPath.row
        cell?.textLabel?.text = data[row]
        cell.detailTextLabel?.text = subData[row]

        // cell image 넣기
        let myImage = UIImage(named: "dog50x50.png")
        //let myImageView = UIImageView(image: myImage)
        cell.imageView?.image = myImage

        /// Accessory Type
        if row == 0 {
            cell.accessoryType = UITableViewCellAccessoryType.Checkmark
        } else if row == 1 {
            cell.accessoryType = UITableViewCellAccessoryType.DetailButton
        } else if row == 2 {
            cell.accessoryType = UITableViewCellAccessoryType.DetailDisclosureButton
        } else {
            cell.accessoryType = UITableViewCellAccessoryType.DisclosureIndicator
        }

        return cell
    }

    // cell을 tap 할때 index 출력
    func tableView(tableView: UITableView, didSelectRowAtIndexPath indexPath: NSIndexPath) {
        print("You selected \(indexPath.row)")
    }
}
Simple TableView & UIAlertController


//  XCode 8.2
//  ViewController.swift
//  SimpleTableView & AlertController
//
//  Created by 김종현 on 2017. 5. 2..
//  Copyright © 2017년 김종현. All rights reserved.

import UIKit

class ViewController: UIViewController, UITableViewDataSource, UITableViewDelegate {

    var data = ["Dog", "Cat", "Pig", "Cow", "Mouse", "Sheep"]
    var price = ["1000", "1500", "2000", "10000", "10", "500"]

    @IBOutlet weak var myTableView: UITableView!

    override func viewDidLoad() {
        super.viewDidLoad()
        myTableView.dataSource = self
        myTableView.delegate = self
    }

    // UITableViewDataSource Delegate Method call
    public func numberOfSections(in tableView: UITableView) -> Int {
    // Default is 1 if not implemented
        return 2
    }

    public func tableView(_ tableView: UITableView, numberOfRowsInSection section: Int) -> Int {

        return data.count
    }

    // 실제 cell을 만들고 데이터 할당
    public func tableView(_ tableView: UITableView, cellForRowAt indexPath: IndexPath) -> UITableViewCell {

        // cell을 하나 메모리 할당함. 다음에는 재활용 됨
        let cell = myTableView.dequeueReusableCell(withIdentifier: "myCell", for: indexPath)
        //cell.textLabel?.text = "동물원"
        cell.textLabel?.text = data[indexPath.row]
        cell.detailTextLabel?.text = price[indexPath.row]

        // cell에 image 넣기
        cell.imageView?.image = UIImage(named: "myPic.png")

        return cell
    }

    func tableView(_ tableView: UITableView, titleForHeaderInSection section: Int) -> String? {
    // fixed font style. use custom view (UILabel) if you want something different

        if section == 0 {
            return "section header " + String(section)
        } else {
            return "section header " + String(section)
        }
    }

    public func tableView(_ tableView: UITableView, titleForFooterInSection section: Int) -> String? {

        if section == 0 {
            return "section footer " + String(section)
        } else {
            return "section footer " + String(section)
        }
    }

    // UITableViewDelegate Method
    public func tableView(_ tableView: UITableView, didSelectRowAt indexPath: IndexPath) {

        let mySection = indexPath.section
        let myRow = indexPath.row
        print("I selected \(mySection) Section \(myRow) Row")
        let output = String(mySection) + " Section" + String(myRow) + " Row" + " Seclected"

        // Closure
        let alert = UIAlertController(title: "AlertController", message: "Test", preferredStyle: .alert)

        alert.addAction(UIAlertAction(title: output, style: .default) { action in
            // perhaps use action.title here
            print("Default")

        })

        alert.addAction(UIAlertAction(title: "CANCEL", style: .cancel, handler: { (action) -> Void in
            print("취소 했습니다.")
        }))


        alert.addAction(UIAlertAction(title: "확인", style: .default) { action in
            print("확인하세요")
        })

        alert.addAction(UIAlertAction(title: "DELETE", style: .destructive, handler: { (action) -> Void in
            self.view.backgroundColor = UIColor.red
            print("삭제 했습니다.")
        }))

        self.present(alert, animated: true, completion: nil)
    }
}
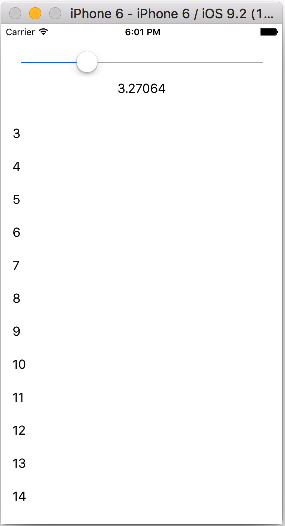
UISlider을 이용한 Times Table 만들기

//  XCode 8.2
//  ViewController.swift
//  TableSlider

import UIKit

class ViewController: UIViewController, UITableViewDataSource, UITableViewDelegate {

    @IBOutlet weak var mySlider: UISlider!
    @IBOutlet weak var myLabel: UILabel!
    @IBOutlet weak var myTableView: UITableView!

    override func viewDidLoad() {
        super.viewDidLoad()
        // Do any additional setup after loading the view, typically from a nib.
        myTableView.dataSource = self
        myTableView.delegate = self
    }

    @IBAction func moveSlider(_ sender: UISlider) {
        myLabel.text = String(mySlider.value)
        myTableView.reloadData()
    }

    func tableView(_ tableView: UITableView, numberOfRowsInSection section: Int) -> Int {
        return 20
    }

    public func tableView(_ tableView: UITableView, cellForRowAt indexPath: IndexPath) -> UITableViewCell {
        let myCell = myTableView.dequeueReusableCell(withIdentifier: "myCell", for: indexPath)
        let timeTableValue = Int(mySlider.value)
        myCell.textLabel?.text = String(timeTableValue + indexPath.row)
        return myCell
    }
}
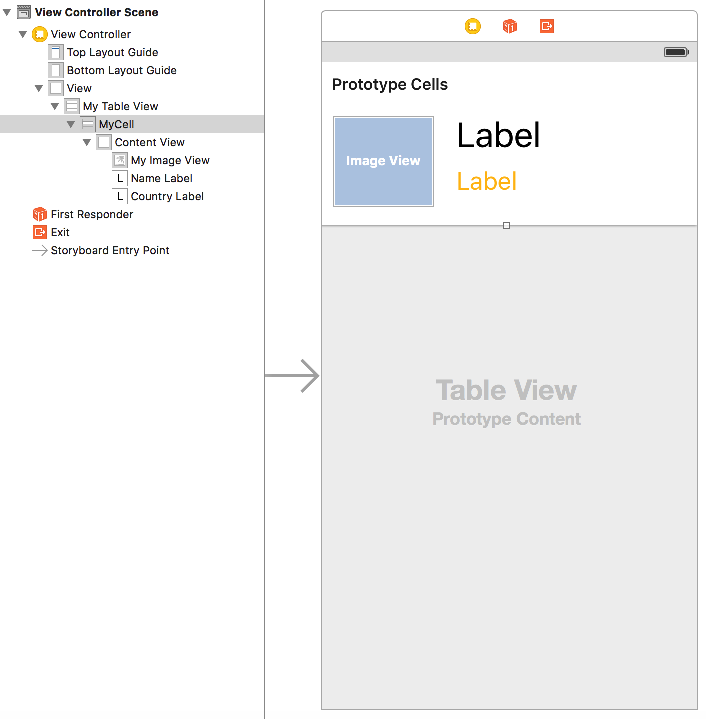
Custom Cell 만들기
Basic Table View와의 차이점
Storyboard에서 Cell Design, outlet 연결
UITableViewCell.class 작성 (UITableViewCell 클래스 상속)
//  ViewController.swift
//  Custom Table Test

import UIKit

class ViewController: UIViewController, UITableViewDataSource, UITableViewDelegate {

    var name = ["cat", "dog", "pig", "dolphin", "cow"]
    var country = ["KOREA", "JAPAN", "ITALY", "USA", "CHINA"]

    @IBOutlet var myTableView: UITableView!

    override func viewDidLoad() {
        super.viewDidLoad()
        // Do any additional setup after loading the view, typically from a nib.
        myTableView.delegate = self
        myTableView.dataSource = self
    }

    // delegate method 구현
    //1. section 수 요청은 optional이므로 구현하지 않으면 자동으로 1

    //2. row 수 요청
    func tableView(tableView: UITableView, numberOfRowsInSection section: Int) -> Int {
        return name.count
    }

    //3. cell의 수만큼 메모리 할당 및 재활용
    func tableView(tableView: UITableView, cellForRowAtIndexPath indexPath: NSIndexPath) -> UITableViewCell {

        // UITableViewCell을 Custom Cell인 MyTableViewCell로 다운 캐스팅(형변환) 함
        let cell = myTableView.dequeueReusableCellWithIdentifier("MyCell", forIndexPath: indexPath) as! MyTableViewCell

        cell.myImageView.image = UIImage(named: name[indexPath.row] + ".jpg")
        cell.nameLabel.text = name[indexPath.row]
        cell.countryLabel.text = country[indexPath.row]

        return cell
    }
}
//  MyTableViewCell.swift

import UIKit

class MyTableViewCell: UITableViewCell {

    @IBOutlet var myImageView: UIImageView!
    @IBOutlet var nameLabel: UILabel!
    @IBOutlet var countryLabel: UILabel!

    override func awakeFromNib() {
        super.awakeFromNib()
        // Initialization code
    }

    override func setSelected(selected: Bool, animated: Bool) {
        super.setSelected(selected, animated: animated)

        // Configure the view for the selected state
    }
}
Static Cell vs. Dynamic Prototype Cell
- Static Cell은
UITableViewController에서만 사용 가능(UITableView를 상속 받은UIViewController의 경우는 에러가 발생하여 사용 불가능함) - Dynamic Cell과는 달리 Cell을 delegate 함수들을 사용하여 동적으로 생성하지 않음(
UITableViewDataSource, UITableViewDelegate함수를 사용하지 않음) - 간단한 정적인 테이블을 제작할 때 편리함
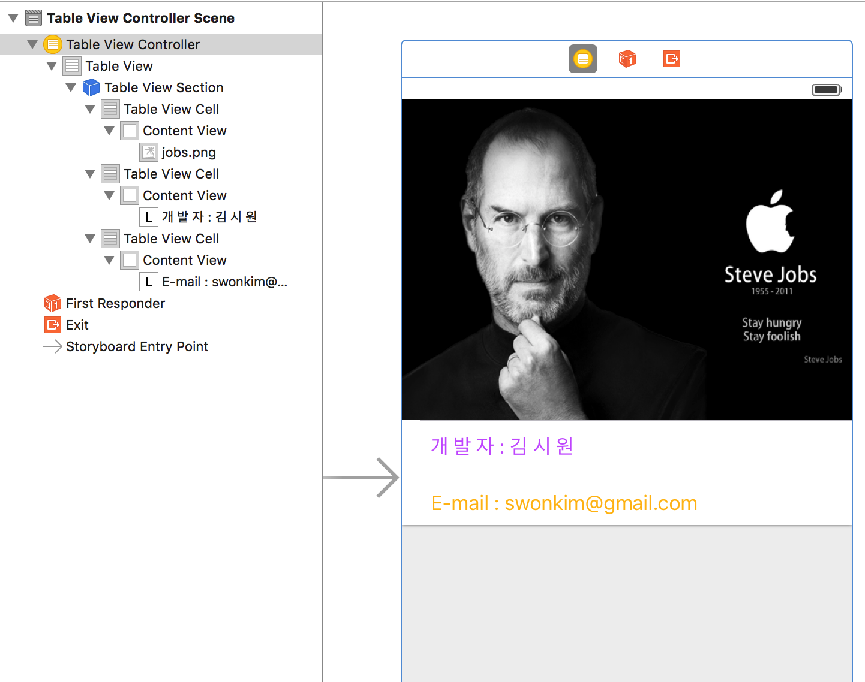
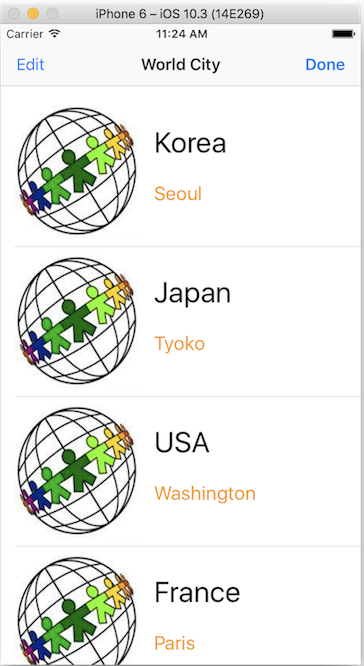
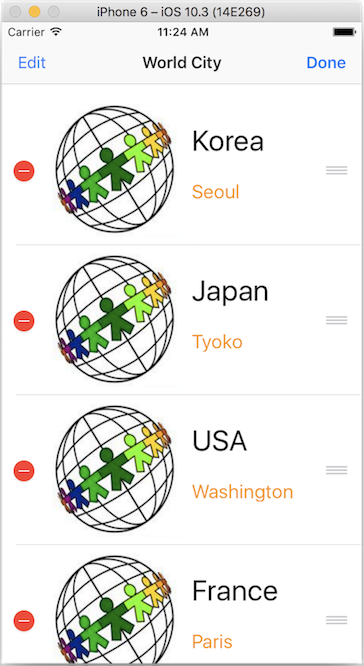
Cell Delete, Reorder

// ViewController.swift
// XCode 8.3.2
import UIKit
class ViewController: UIViewController, UITableViewDataSource, UITableViewDelegate {
var data01 = ["Korea", "Japan", "USA", "France"]
var data02 = ["Seoul", "Tyoko", "Washington", "Paris"]
@IBOutlet weak var myTableView: UITableView!
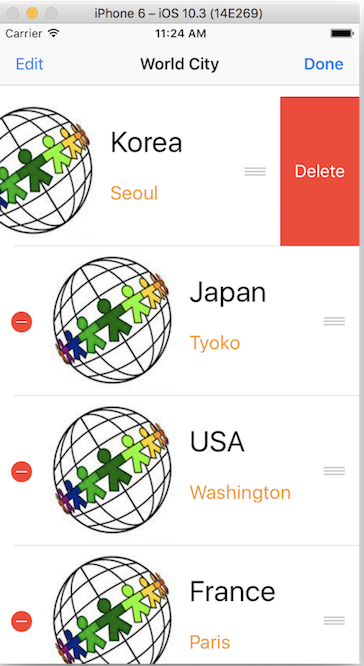
@IBAction func editable(_ sender: UIBarButtonItem) {
myTableView.isEditing = true
}
@IBAction func NonEditable(_ sender: UIBarButtonItem) {
myTableView.isEditing = false
}
override func viewDidLoad() {
super.viewDidLoad()
// Do any additional setup after loading the view, typically from a nib.
myTableView.dataSource = self
myTableView.delegate = self
}
public func tableView(_ tableView: UITableView, numberOfRowsInSection section: Int) -> Int {
return data01.count
}
public func tableView(_ tableView: UITableView, cellForRowAt indexPath: IndexPath) -> UITableViewCell {
let myCell: MyTableViewCell = myTableView.dequeueReusableCell(withIdentifier: "myCell", for: indexPath) as! MyTableViewCell
myCell.myLable1.text = data01[indexPath.row]
myCell.myLabel2.text = data02[indexPath.row]
myCell.myImgView.image = UIImage(named: "logo2.png")
return myCell
}
// cell이 edit 가능하게 함, default는 true
public func tableView(_ tableView: UITableView, canEditRowAt indexPath: IndexPath) -> Bool {
return true
}
// cell 삭제 및 추가
public func tableView(_ tableView: UITableView, commit editingStyle: UITableViewCellEditingStyle, forRowAt indexPath: IndexPath) {
if editingStyle == UITableViewCellEditingStyle.delete {
data01.remove(at: indexPath.row)
myTableView.reloadData()
} else if editingStyle == .insert {
// 추가할 데이터 작업
}
}
// cell move & reorder
public func tableView(_ tableView: UITableView, moveRowAt sourceIndexPath: IndexPath, to destinationIndexPath: IndexPath) {
let tmp1 = data01[destinationIndexPath.row]
data01[destinationIndexPath.row] = data01[sourceIndexPath.row]
data01[sourceIndexPath.row] = tmp1
let tmp2 = data01[destinationIndexPath.row]
data02[destinationIndexPath.row] = data01[sourceIndexPath.row]
data02[sourceIndexPath.row] = tmp2
myTableView.reloadData()
}
}
// MyTableViewCell.swift
// XCode 8.3.2

import UIKit

class MyTableViewCell: UITableViewCell {

    @IBOutlet weak var myImgView: UIImageView!
    @IBOutlet weak var myLable1: UILabel!
    @IBOutlet weak var myLabel2: UILabel!

    override func awakeFromNib() {
        super.awakeFromNib()
        // Initialization code
    }

    override func setSelected(_ selected: Bool, animated: Bool) {
        super.setSelected(selected, animated: animated)

        // Configure the view for the selected state
    }
}
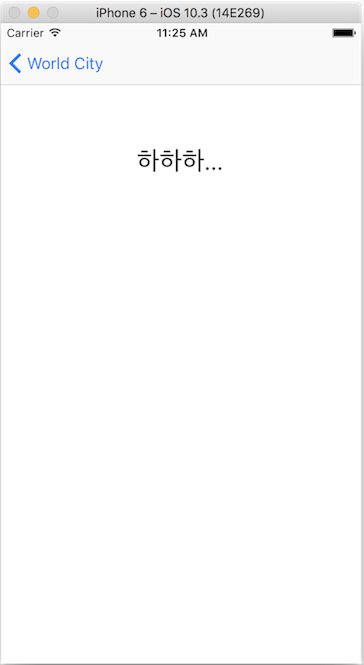
//  DetailViewController.swift
//  XCode 8.3.2

import UIKit

class DetailViewController: UIViewController {

    @IBOutlet weak var detailLabel: UILabel!

    override func viewDidLoad() {
        super.viewDidLoad()

        // Do any additional setup after loading the view.
        detailLabel.text = "하하하 나오네!"
    }

    /*
    // MARK: - Navigation

    // In a storyboard-based application, you will often want to do a little preparation before navigation
    override func prepare(for segue: UIStoryboardSegue, sender: Any?) {
        // Get the new view controller using segue.destinationViewController.
        // Pass the selected object to the new view controller.
    }
    */
}