01 장
1. Git/ GitHub 사용하기
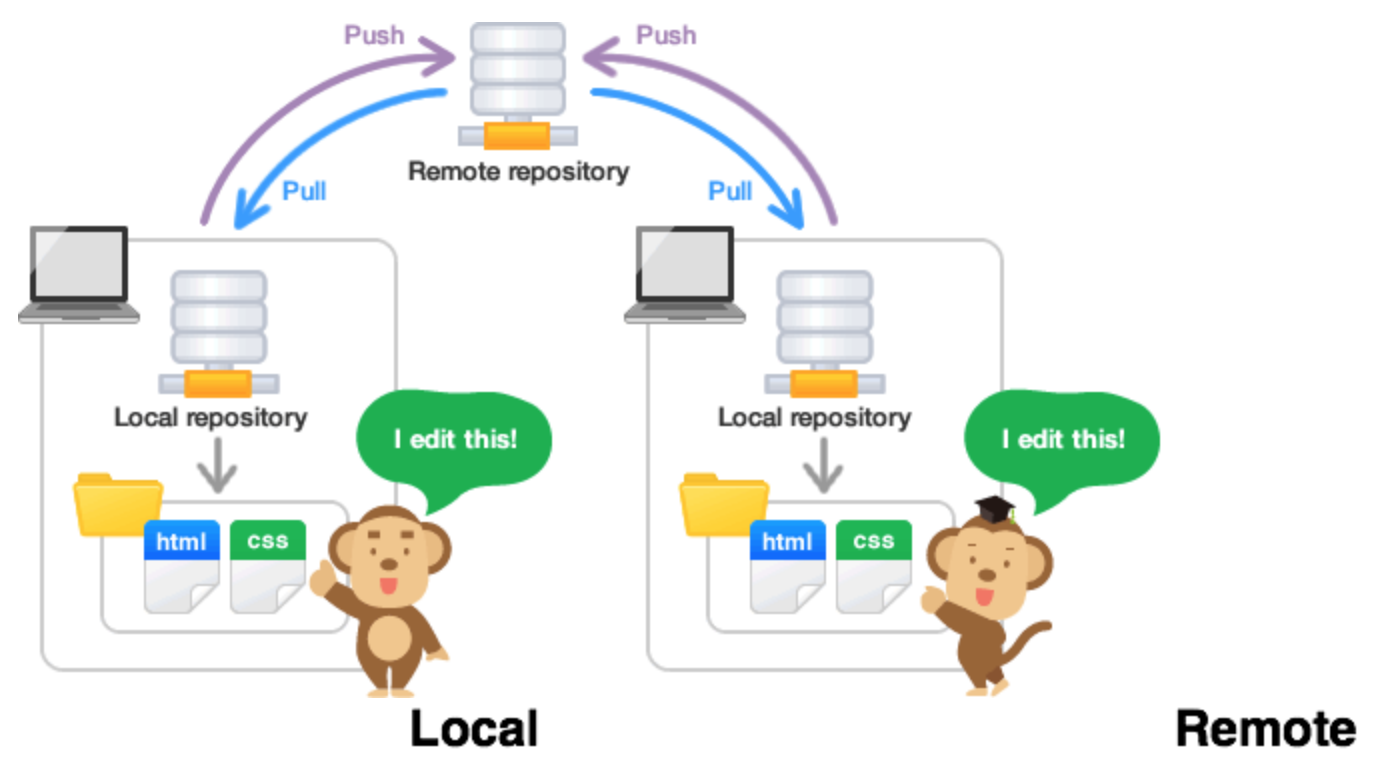
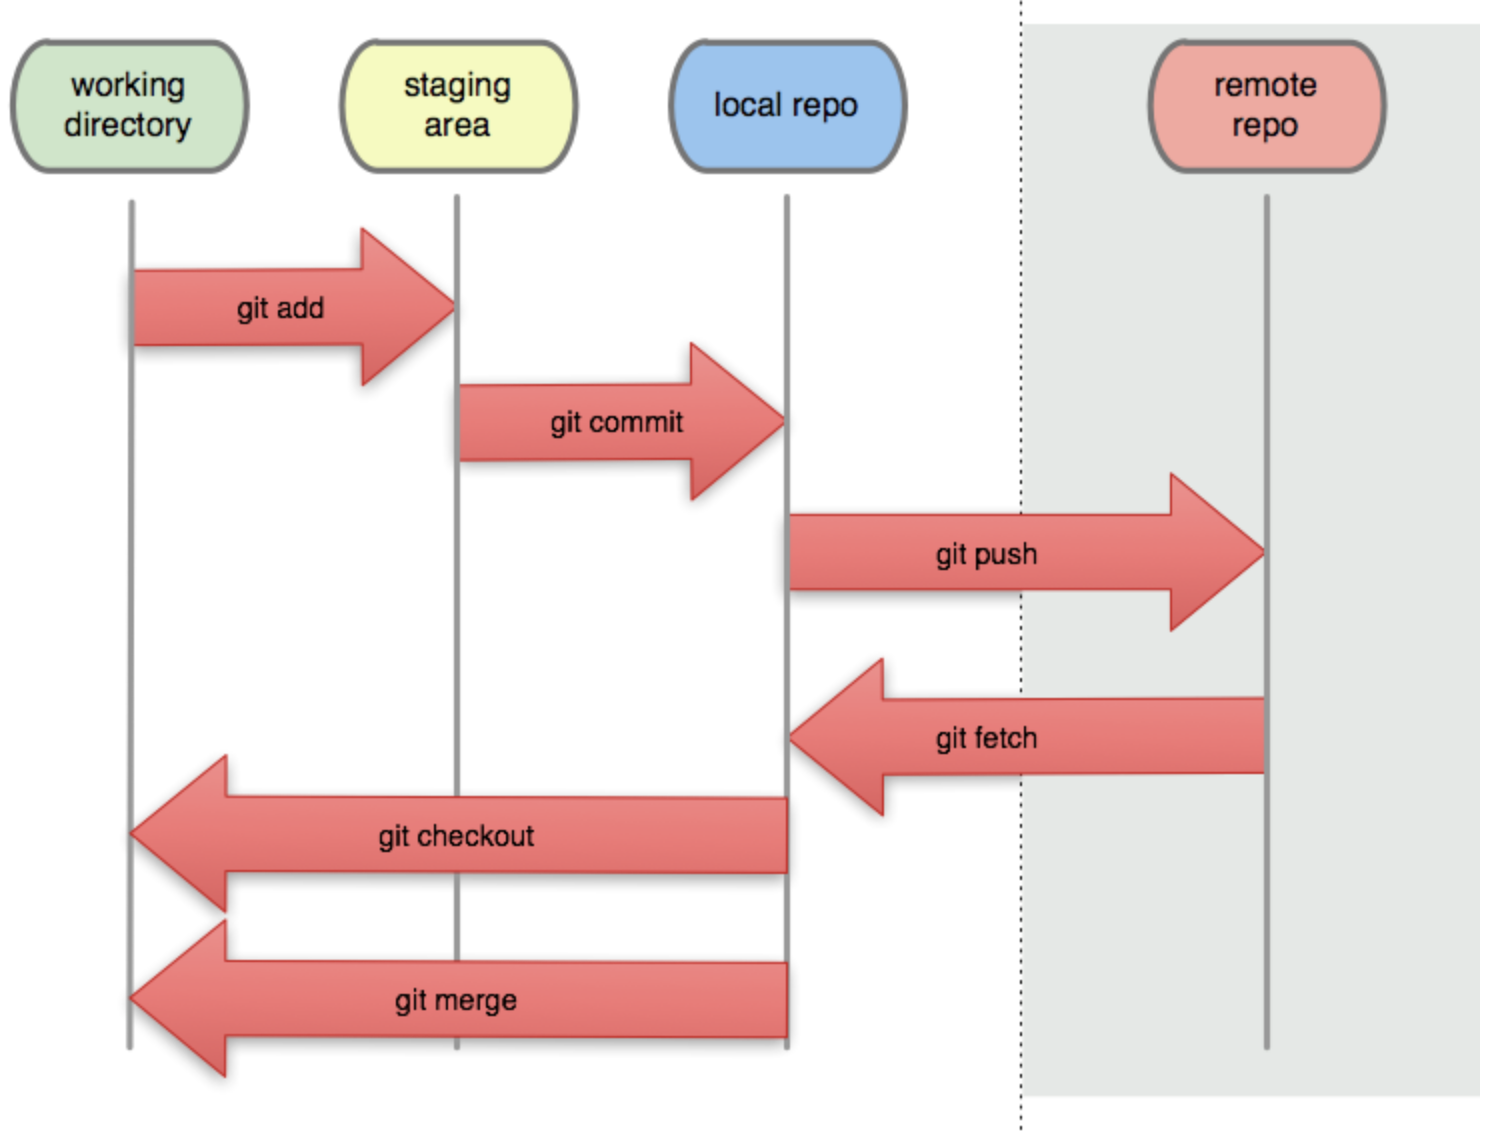
Git 개요
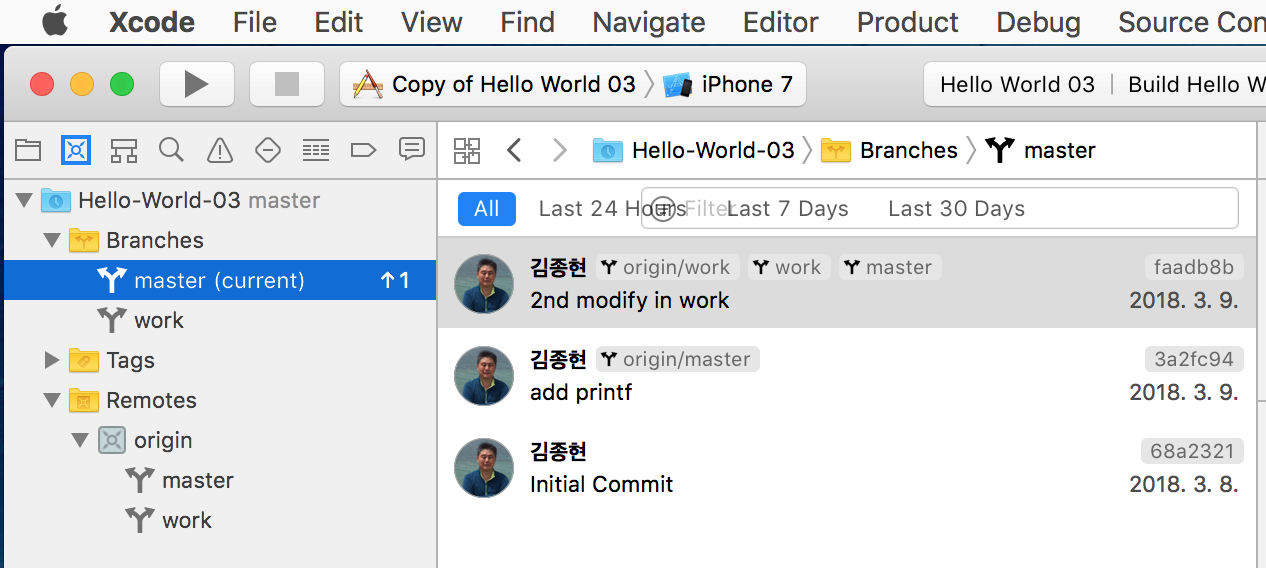
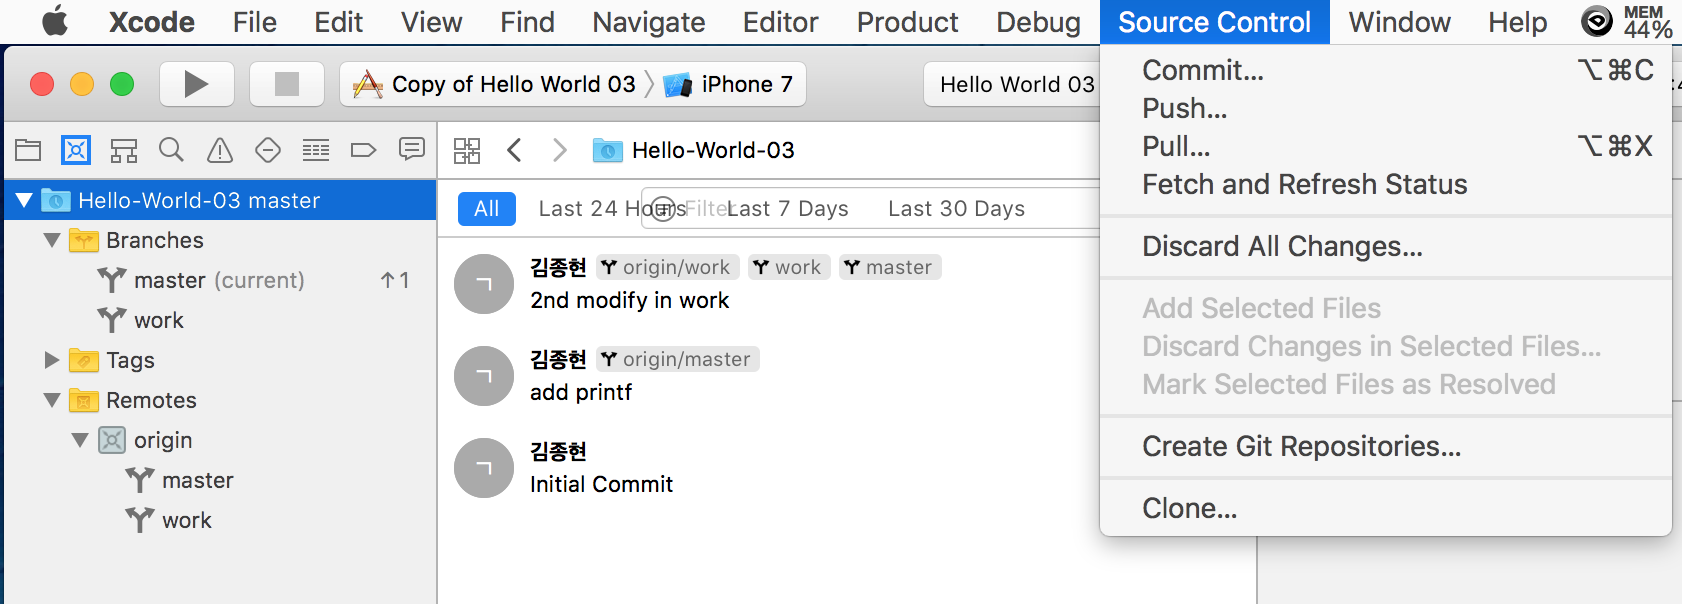
XCode에서 Git/ GitHub 사용하기
Source Control Navigator

2. 앱에 Label 추가하기
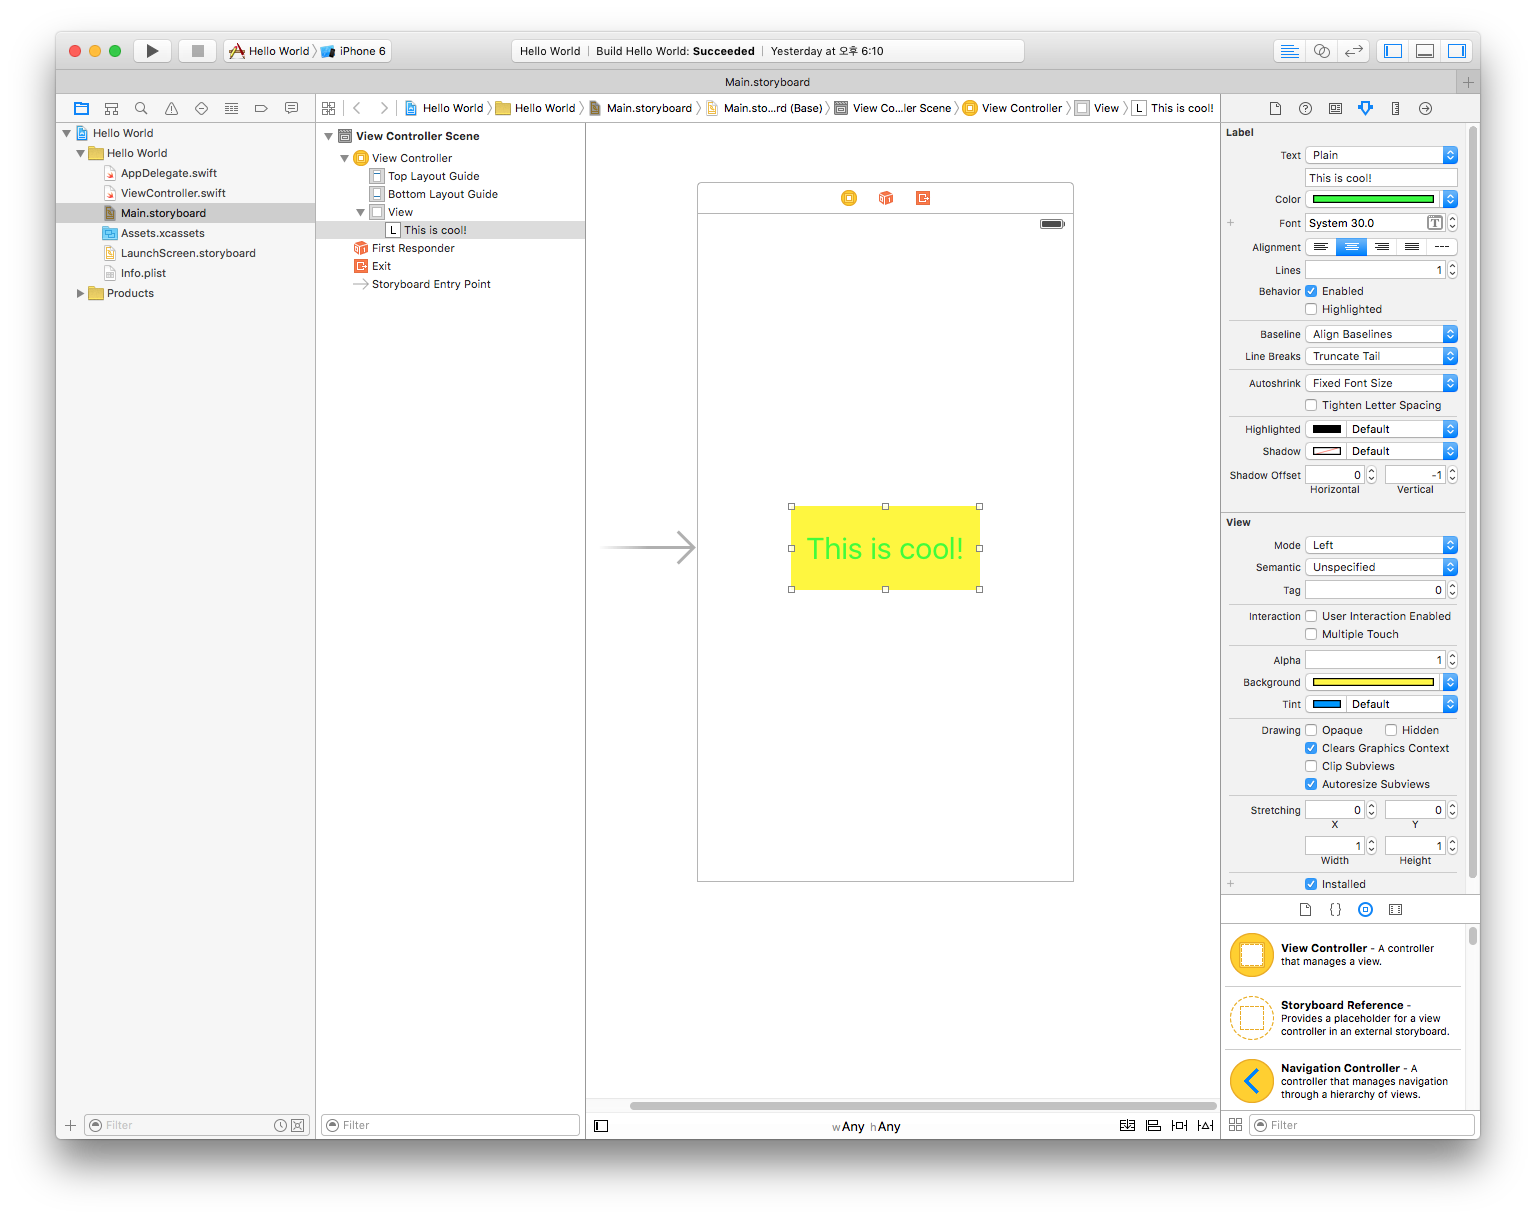
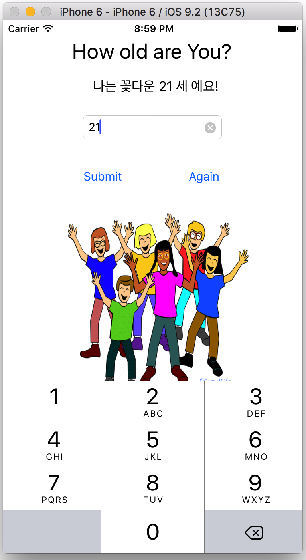
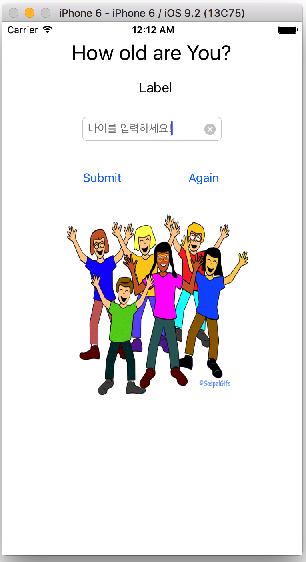
2 How old are you?
IBOutlet변수는 Story Board와 소스 코드(UIViewController.swift)와의 연결을 위한 변수임IBAction메소드는 Story Board의 이벤트 처리 객체를 소스 코드(UIViewController.swift)에서 이벤트 핸들링을 위한 함수임

// ViewController.swift
import UIKit
class ViewController: UIViewController, UITextFieldDelegate {
@IBOutlet var resultLabel: UILabel!
@IBOutlet var myTextField: UITextField!
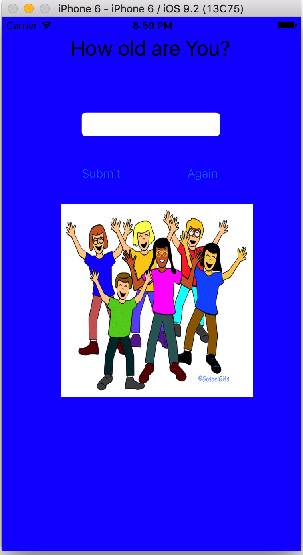
@IBAction func againButtonPressed(sender: AnyObject) {
resultLabel.text = ""
myTextField.text = ""
}
@IBAction func buttonPressed(sender: AnyObject) {
// 강제 풀기(Forced Unwrapping)
/*
let myAge = myTextField.text! // UIView.text? 는 optional type 임
//let myAge = nil
print("나는 꽃다운" + myAge + "세 예요!")
*/
// Optional Binding
if let myAge = myTextField.text {
//print("나는 꽃다운" + myAge + "세 예요!")
let resultStr = "나는 꽃다운 " + myAge + " 세 예요!"
resultLabel.text = resultStr
}
}
override func viewDidLoad() {
super.viewDidLoad()
// textField의 delete key 보이게 설정
myTextField.clearButtonMode = UITextFieldViewMode.Always
}
// 바탕(UIView)에 터치를 하면 키패드를 끝낸다.
override func touchesBegan(touches: Set<UITouch>, withEvent event: UIEvent?) {
view.endEditing(true)
view.backgroundColor = UIColor.blueColor()
}
// called when clear button pressed. return NO to ignore (no notifications)
func textFieldShouldClear(textField: UITextField) -> Bool {
return true
}
}
3 UITextFieldDelegate
Managing Editing
- textFieldShouldBeginEditing:
- textFieldDidBeginEditing:
- textFieldShouldEndEditing:
- textFieldDidEndEditing:
Editing the Text Field’s Text
- textField:shouldChangeCharactersInRange:replacementString:
- textFieldShouldClear:
- textFieldShouldReturn:
// UITextFieldDelegate Fuction Test
// MARK: UITextFieldDelegate Function
    // called when 'return' key pressed. return NO to ignore.
    func textFieldShouldReturn(textField: UITextField) -> Bool {
        myTextField.resignFirstResponder()
        return true
    }

    func textFieldShouldClear(textField: UITextField) -> Bool {
        print("textFieldShouldClear started")
        return false
    }

    // return NO to disallow editing.
    func textFieldShouldBeginEditing(textField: UITextField) -> Bool  {
        print("textFieldShouldBeginEditing started")
        return true
    }

    // became first responder
    func textFieldDidBeginEditing(textField: UITextField) {
        print("textFieldDidBeginEditing started")
    }

    func textFieldDidEndEditing(textField: UITextField) {
        print("textFieldDidEndEditing started")
    }
// MARK: UITextFieldDelegate Fuction
// RETURN key를 터치하면 키패드가 사라짐
func textFieldShouldReturn(textField: UITextField) -> Bool {
     catAgeTextField.resignFirstResponder()
     return true
}

//  UITextField의 delete key를 터치하면 입력한 모든 문자를 지움
func textFieldShouldClear(textField: UITextField) -> Bool {
     return true
}

// ViewController.swift
import UIKit
class ViewController: UIViewController, UITextFieldDelegate {
@IBOutlet var catAgeTextField: UITextField!
@IBOutlet var resultLabel: UILabel!
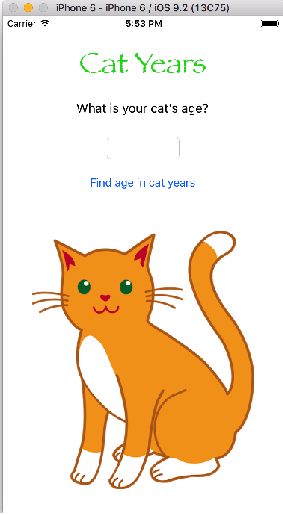
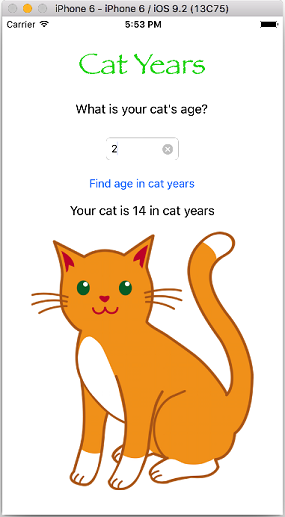
@IBAction func findAge(sender: AnyObject) {
var catAge = Int(catAgeTextField.text!)!
catAge = catAge * 7
resultLabel.text = "Your cat is \(catAge) in cat years"
}
override func viewDidLoad() {
super.viewDidLoad()
// Do any additional setup after loading the view, typically from a nib.
catAgeTextField.delegate = self
catAgeTextField.clearButtonMode = UITextFieldViewMode.Always
}
// background view를 touch하면 키패드가 내려감
override func touchesBegan(touches: Set<UITouch>, withEvent event: UIEvent?) {
self.view.endEditing(true)
}
// default 키패드의 경우 [Return] 키를 터치하면 실행
func textFieldShouldReturn(textField: UITextField) -> Bool {
catAgeTextField.resignFirstResponder()
return true
}
// textField의 clear button를 touch하면 textField의 입력된 글이 모두 사라짐
func textFieldShouldClear(textField: UITextField) -> Bool {
return true
}
}
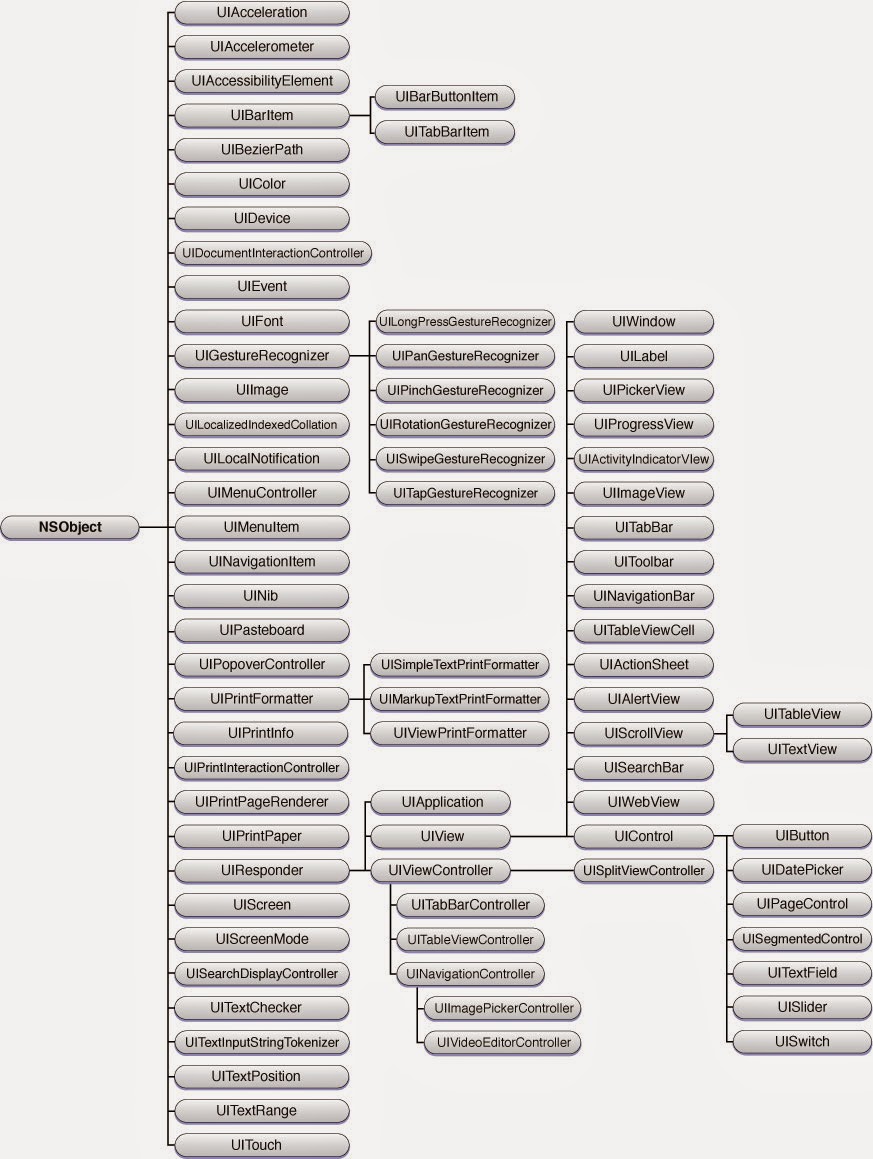
UIKit 클래스 계층구조
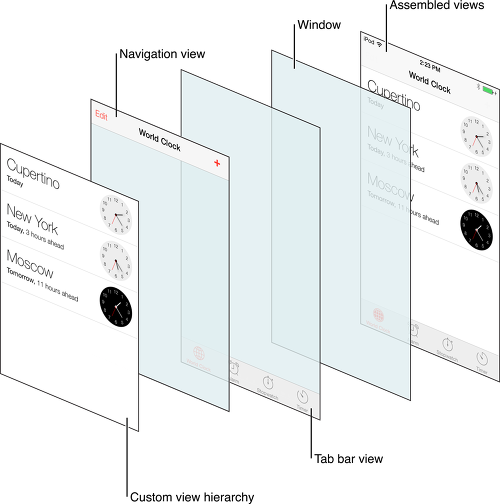
UIView의 계층구조
참고 : https://rhamm:er.tistory.com/23
앱 생명주기(APP Life cycle)
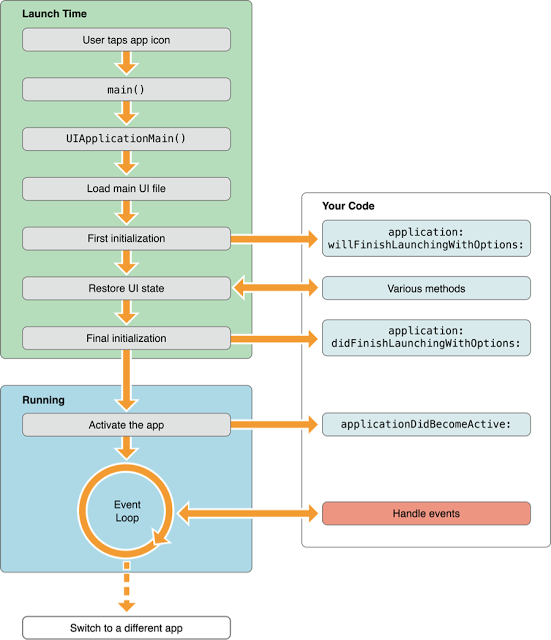
application(_:didFinishLaunching:) - 앱이 처음 시작될 때 실행
applicationWillResignActive: - 앱이 active 에서 inactive로 이동될 때 실행
applicationDidEnterBackground: - 앱이 background 상태일 때 실행
applicationWillEnterForeground: - 앱이 background에서 foreground로 이동 될때 실행 (아직 foreground에서 실행중이진 않음)
applicationDidBecomeActive: - 앱이 active상태가 되어 실행 중일 때
applicationWillTerminate: - 앱이 종료될 때 실행
뷰 컨트롤러 생명주기(ViewController Life cycle)
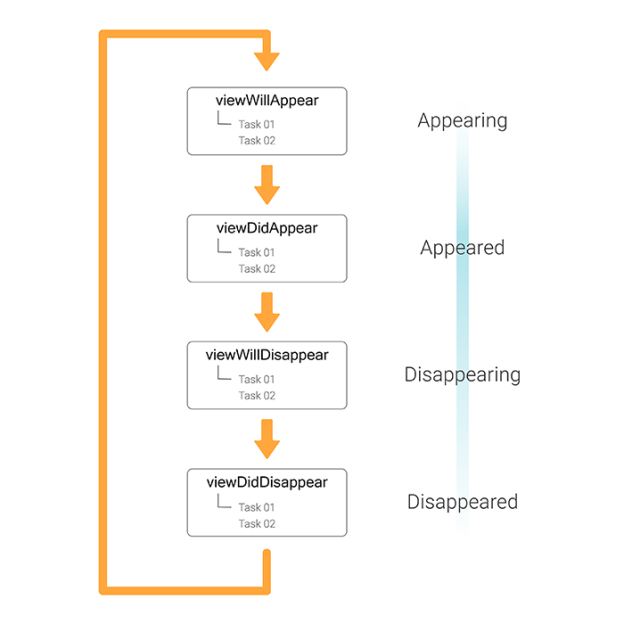
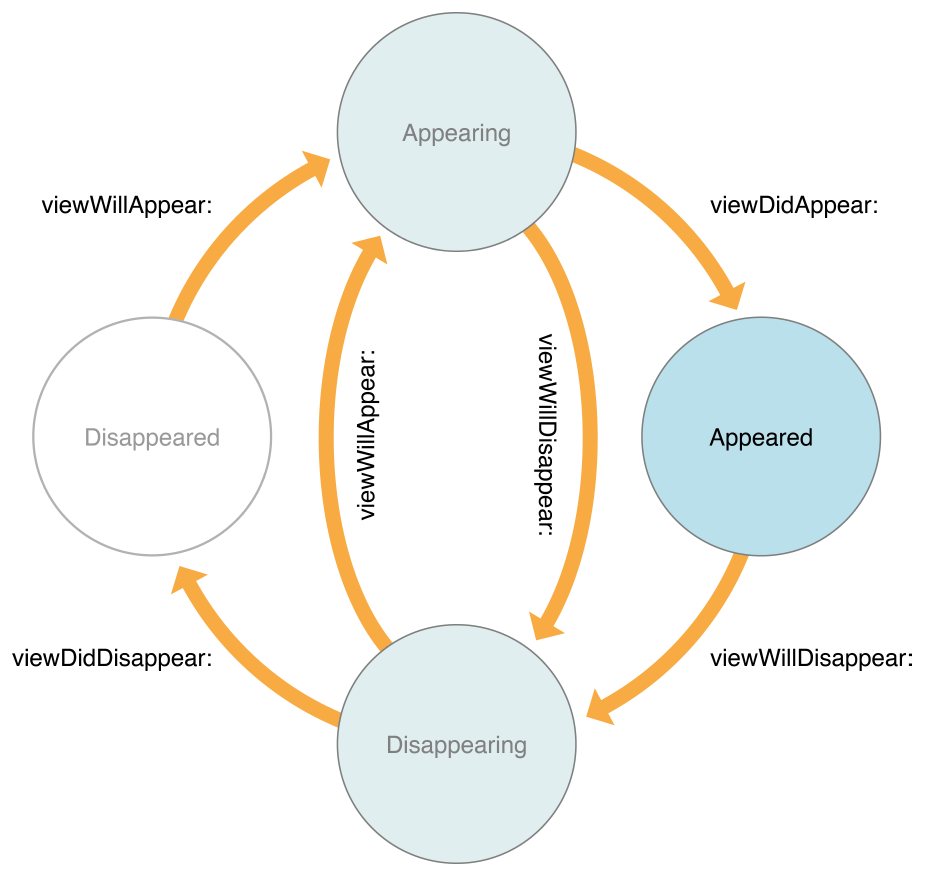
ViewDidLoad - 해당 뷰컨트롤러 클래스가 생성될 때(ViewWillAppear전에 실행) 실행됩니다. Low memory와 같은 특별한 경우가 아니라면 딱 한번만 실행되기 때문에 초기화 할 때 사용 할 수 있습니다.
ViewWillAppear - 뷰 컨트롤러가 화면에 나타나기 직전에 실행됩니다. 뷰 컨트롤러가 나타나기 직전에 항상 실행되기 때문에 해당 뷰 컨트롤러가 나타나기 직전마다 일어나는 작업들을 여기에 배치 시킬 수 있습니다.
ViewDidAppear - 뷰 컨트롤러가 화면에 나타난 직후에 실행됩니다. 화면에 적용될 애니메이션을 그리거나 API로 부터 정보를 받아와 화면을 업데이트 할 때 이곳에 로직을 위치시키면 좋습니다. 왜냐하면 지나치게 빨리 애니메이션을 그리거나 API에서 정보를 받아와 뷰 컨트롤러를 업데이트 할 경우 화면에 반영되지 않습니다.
ViewWill/DidDisappear - 뷰 컨트롤러가 화면에 나타난 직전/직후에 실행됩니다.
XCode 단축키
cmd + 1 (project navigator)
cmd + 2 (symbol navigator)
cmd + 3 (find navigator)
cmd + 4 (issue navigator)
cmd + 5 (test navigator)
cmd + 6 (debug navigator)
cmd+ 7 (breakpoint navigator)
cmd + 8 (report navigator)
cmd + shift + Y (hide / show debug area)
cmd + option + 0 (zero) OR cmd + alt + 0 (zero) (hide/show utilities pane)
cmd + 0 (zero) (hide/show navigator panel
If storyboard is opened
- cmd + option + 1 OR cmd + alt + 1 (file inspector)
- cmd + option + 2 OR cmd + alt + 2 (quick help)
- cmd + option + 3 OR cmd + alt + 3 (identity inspector)
- cmd + option + 4 OR cmd + alt + 4 (attributes inspector)
- cmd + option + 5 OR cmd + alt + 5 (size inspector)
- cmd + option + 6 OR cmd + alt + 6 (connections inspector)
- ctrl + 1 (hierarchical menu)
- ctrl + cmd + Left arrow (previous file)
- ctrl + cmd + Right arrow (next file)
- cmd + option + return OR cmd + alt + Enter (show assistant editor)
- cmd + return OR cmd + Enter (hide assistant editor)
- cmd + Shift + Y (hide / show debug area)
- cmd + option + 0 (zero) OR cmd + alt + 0 (zero) (hide show utilities pane)
- cmd + 0 (zero) (hide / show navigator pane)
- cmd + t (open tab bar)
- cmd + shift + } (switch between the tab bars)
- cmd + shift + t (opens secondary project window)
cmd + shift + O (not zero) (I don’t know the name, but a textbox appears & you can write file name into it & press Return / Enter)
ctrl + 6 (displays list of all the methods & you can jump to any method by typing its name)
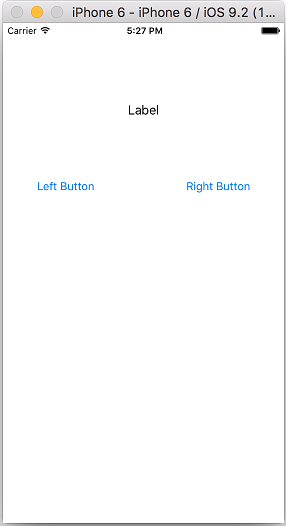
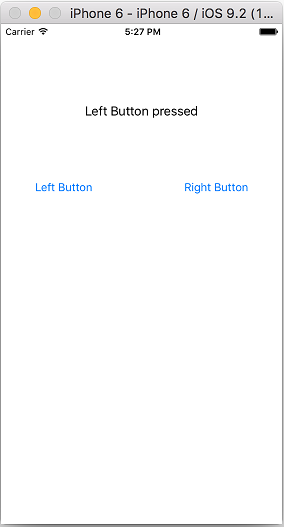
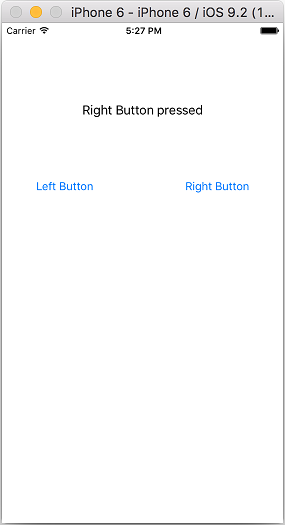
[코딩 문제 01] Button Fun 제작
UIButton에 있는 현재의 text(Left Button, Right Button)을 받아와서 UILabel에 출력하시오.
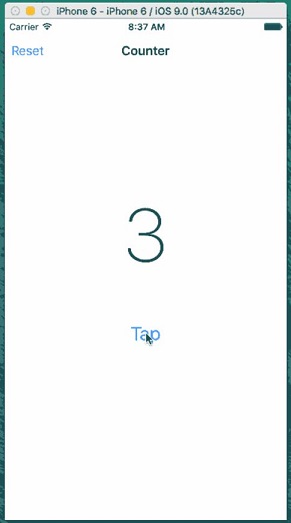
[코딩 문제 02] counter 만들기

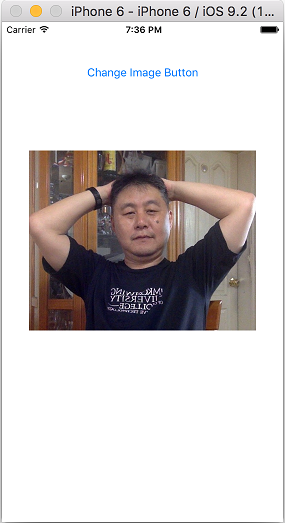
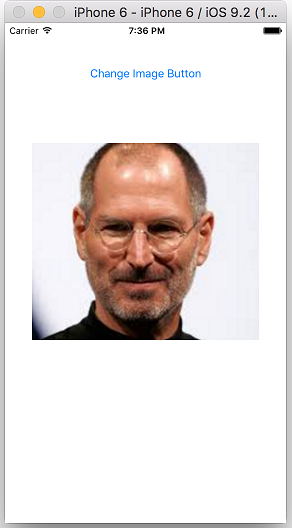
[코딩 문제 03] 버튼을 터치하여 Image 바꾸기
toggle switch를 사용하여 버튼을 계속 터치하면 연속적으로 두개의 이미지가 바뀌도록 제작하시오.
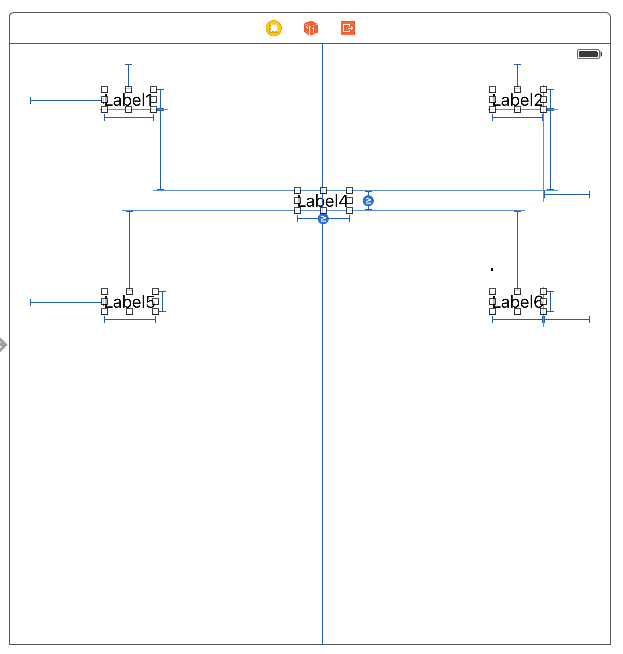
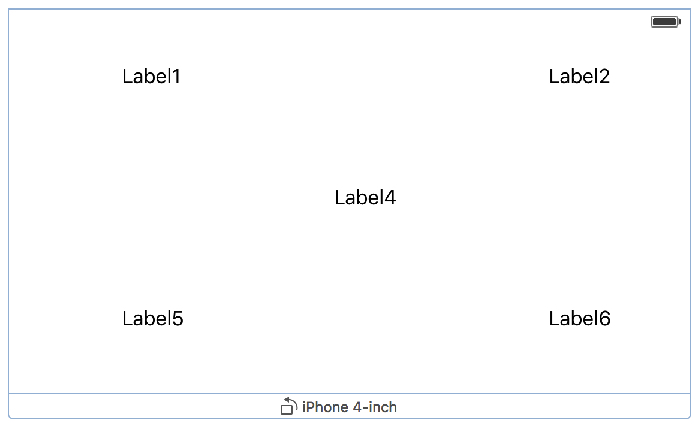
[코딩 문제 04] AutoLayout 사용하기 01
[코딩 문제 01], [코딩 문제 02]의 UI를 AutoLayout를 적용하여 iPhone 4-inch(iPhone 4), 4.7-inch(iPhone 5,6), 5.5-inch(iPhone 6 plus)의 회상도에 적응적으로 보여질 수 있도록 제작하시오.
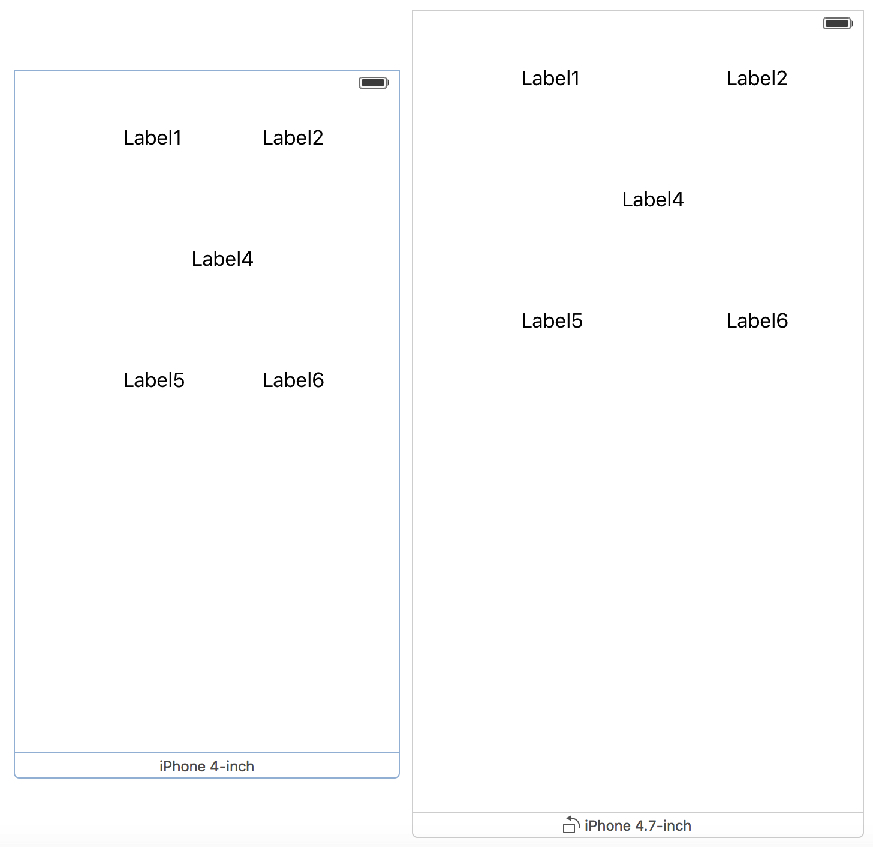
[코딩 문제 05] AutoLayout 사용하기 02
다음 UI와 같이 AutoLayout을 사용하여 portrait와 landscape 화면이 모두 적응적으로 보여질 수 있도록 제작하시오.
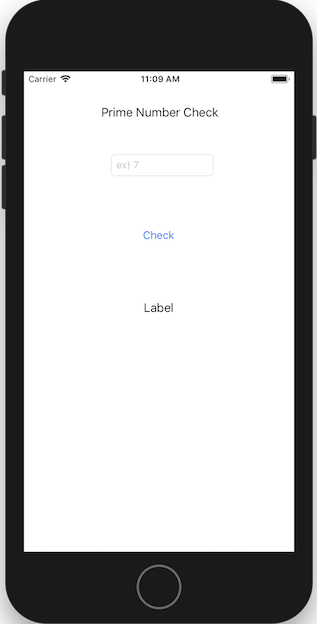
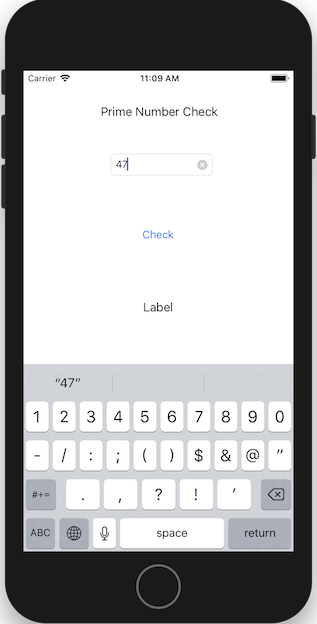
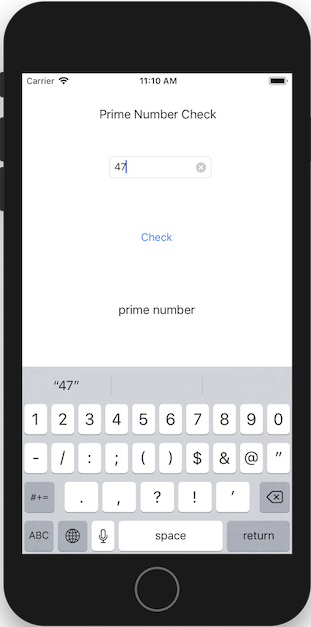
[코딩 문제 06] 소수(Prime Number) 구하기 앱 제작
아래의 Playgroung 알고리즘을 이용하여 소수(Prime Number)를 구하는 앱을 제작하시오.
- 조건 1) Check Button을 터치하면 TextField와 Result Label의 값이 초기화(clear) 된다.
- 조건 2)
TextField를
ClearButtonMode를Always로 설정하시오. - 조건 3) 바탕화면(background view)를 터치하면 키패드가 사라진다.
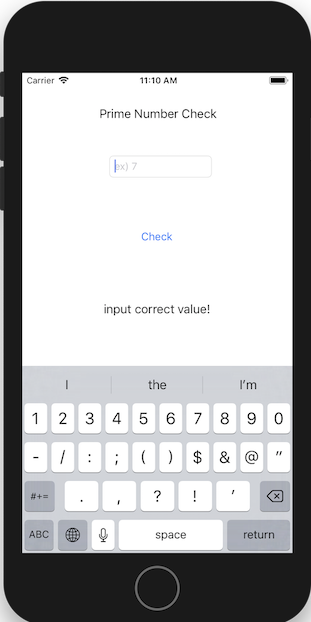
- 조건 4) TextField에 입력을 하지 않고 입력처리 버튼(Check Button)을 터치하면 결과를 계산하지 않고 "숫자를 입력하시오" 혹은 "Please enter a number"를 Result Label에 출력하도록 하시오.
- 조건 5) 숫자 이외의 문자(예: A, B, C...)가 입력되면 "올바른 숫자를 입력하시오!"라는 문자열 Result Label에 나타난다.
- 조건 6) [Return] 키를 터치하면 키패드가 사라지도록 하시오(
UITextFieldDelegate를 사용하여 해당 함수를 overriding 하기 바람)
// 소수의 정의 : 1과 자기 자신으로밖에 나누어지지 않는 1 이외의 정수 - Wiki
// 10은 1, 2, 5으로 나눌때 모두 나머지가 0이 되므로 소수가 아님

import UIKit

var number = 3
var isPrime = true

if number == 1 {
    isPrime = false
}

if number != 2 && number != 1 {
    for i in 2..<number {
        if number % i == 0 {
            isPrime = false
        }
    }
}

print(isPrime)  // false 출력

///////////////////////////////////////////////////////////////////
///////////////////////////////////////////////////////////////////

import UIKit

let number = 17

var isPrime = true

if number == 1 {
    isPrime = false
}

var i = 2

while i < number {
    if number % i == 0 {
        isPrime = false
    }
    i += 1
}

print(isPrime)
결과 화면